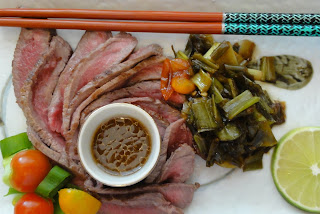
Sunday, August 26, 2012

Larisa's Not Negimaki


Larisa’s Not Negimaki serves 6 normal dinner appetites

One of the side effects of being a foodie who worked in restaurants twenty plus years ago – coupled, perhaps with a mix of nostalgia and memory loss, is that sometimes recipes get embellished in my mind almost beyond recognition.  Sometimes the embellished version tastes better, even if it doesn’t look as pretty when I make it. 

I worked in the upstairs dining room of a Washington, D.C. sushi bar when I was  a young, flamboyant thing.  The kitchen staff seared very tender cuts of beef and sent it in slabs to the the sushi chefs, who sliced it as thin as if it were one of their papery radish garnishes.  We served the beef on big platters, individually rolled like roses with scallions and drizzled with a sauce made of mirin, shoyu, sake and a bit of ginger.  Occasionally a diner unrolled a "maki" and discovered to his or her horror that it was "too long" to eat gracefully without a knife.  Instead of getting a knife, I would cut the strips smaller at their table by manipulating two pairs of chopsticks at once, one in each hand - no knives.  (The trick is to pierce the meat with the points of a pair of skinny chopsticks closed together, then push them open at once.  People actually started requesting this silly little feat!)  The meat in the picture above was sliced rather thickly with a Santoku knife and is a rather ordinary cut of beef; I couldn't possibly cut it neatly with chopsticks.

I haven’t eaten this particular dish in a restaurant since probably 1984 or 1985, but I’ve thought of it several times recently, adding a few ingredients and changing the preparation in my mind each time. 

Not Negimaki Ingredients
3 lbs beef, without gristle.  Tri-tip would be great.
Peanut oil for two cast iron skillets

Marinade
2 tbsp. sesame oil
2 tbsp. shoyu or tamari
2 tbsp. mirin
2 tbsp. light vinegar – rice or coconut would be best.
1 tbsp. shiro miso (shiro means white, but it is a light mustard color)
1/3 c. dry sake.  Try to get a reasonably good brand.  If you have to make do with 
         Sho Chiku Bai, make sure you get extra dry.
Juice of ½ lime

Greens from 2 bunches scallions, sliced. 
12-16 cherry tomatoes, sliced in half

Method
Mix all liquid ingredients until smooth.  Heat empty cast iron skillets several minutes on medium high to high heat, until it is smoking hot, then add enough oil to coat bottom and split 3 lb. steak between the two skillets.  Sear on each side – just long enough to make a good crust, about 2 minutes on each side.  Do not leave long enough to cook through.  Steak should be very rare inside but have some crunch at the edges.  Remove from heat and let cool before slicing against the grain into very thin slices.  If you have a good knife, you can slice it thinly enough to roll it up with scallions in the middle like the original negi [scallion] maki [hand roll].)  Pour most of the marinade (reserving 1/3 cup) and half the scallions and cherry tomatoes into one skillet.  Cook, stirring, until reduced by half and vegetables are wilted.  Arrange beef on a platter.  Pour reduced sauce over top.  Arrange fresh vegetables around edges for color.  Serve with some fresh sauce for dipping.    

Enjoy!

Lime Zucchini Fresh Salsa


Chopped Salad/Fresh Salsa

Although I will present a favorite recipe below, this is really more about an idea that is shared in hot climates around the world:  a cold fresh marinated vegetable dish that can be made in advance and enjoyed outdoors with friends.  Unlike egg and potato salads, there is no fear of spoiling.  It doesn’t need cooking, so you won’t need to heat up your already hot kitchen.  And you can use whatever vegetable is threatening to take over your garden right now – even zucchini – and no one will mind. 

The photo is of two variations, one with a lot of zucchini, carrots and green beans but no tomatoes.  The other has no zucchini, no green beans and a lot of tomatoes and cucumber.  The variation in the recipe does include zucchini and we just ate it too fast to take a picture.  The left salad is spicy and Middle Eastern in flavor.  It includes olive oil, basil and lemon juice and would fall in the category of an Israeli chopped salad.  The right and the one I give the recipe for are more Middle or Southwest American.    Add a chunk of bread and a slice of cheese or a few nuts and you have a portable meal.   

Make your salad according to whatever is growing in your garden right now and season it to complement your main dish.  (Some ideas:  Asian:  Bragg's Liquid Aminos, peanut or sesame oil, hot chili oil, juice from some pickled ginger... Greek:  sundried tomatoes, basil, fresh mint, olive oil, red wine vinegar, black olives)  Just start early, so you can chop the vegetables small and let the salad stand at room temperature or in the refrigerator so the marinade has at least two hours to soak in well.  (If it is heavy on tomatoes it will be much better at room temperature!)

I subscribe to Cook’s Illustrated email service, which just sent a corn salsa recipe to me, and as snobbish as it sounds, I like my version better. 

Lime Zucchini Fresh Salsa Ingredients
1 c. diced white onion
½ c. chopped green portion of scallions
3 c. mixed chopped zucchini and summer squash, after seedy center portion has been cut out
            Or 1 ½ c. zucchini and 1 ½ c. cucumber
2 c. corn kernels, frozen
            Or use very fresh, just picked so it is still full of juice and does not have hard skin
1 c. chopped colored bell peppers
Big handful of basil, chopped
Juice of 2-3 large limes
2 c. chopped, tomatoes, most of the seeds and juice removed. 
1 ½ tsp. minced garlic
½ tsp. black pepper
½ tsp. salt
1 tbsp. light vinegar to boost the lime (I use coconut, but rice or white would be ok)

Mix all the above together, taste and adjust seasonings.  Flavor will improve in a couple hours of refrigeration.  

Saturday, August 25, 2012

Sesame Swirl Bread


This is a subtle loaf, since the color of the swirl is not as obvious as in a cinnamon swirl and since it is not as sweet.  But the crust is crisp, the smell scrumptious and the taste just sweet enough to serve as both a breakfast and a dessert bread if you have not become accustomed to commercial bakery breads.  If you have, add one more tablespoon sugar to the dough and two more to the filling.

Dough:
1 tbsp. yeast
1 c. bread flour
1 ½ c. whole wheat flour
1 ½ c. dark rye flour
3 tbsp. dark brown sugar
2 c. water

Leave in bowl, covered with greased wax paper.  Let the above dough ingredients rise for a minimum of 2 hours; 3 is preferable.  Punch down.  Add:
1 c. bread flour
1 tsp. salt
¼ c. toasted sesame oil

Knead on bread board about 5 minutes, adding approximately:
¼ c. additional bread flour as needed
Keep an additional ¼ c. available for flouring a rolling pin and the dough as you roll it out until it is fairly thin, like a thin crust pizza.  Spread with the following:

Filling:
3 tbsp. softened room temperature butter
2 tbsp. sesame oil
3 tbsp. brown sugar
3 tbsp. sesame seeds

Roll up the dough and carefully place on a greased baking stone that has preferably also had a piece of parchment spread on it (because if the filling leaks out, it tends to burn onto the stone and make the bread stick to it).  Cover with greased wax paper.  Let rise an additional 2 hours.  (Bread with a lot of heavy, whole grains is easier to digest, lighter and more flavorful with a long rise.)

Heat oven to 400 degrees.  Once oven has reached temperature, place bread in the oven for 30-40 minutes, depending on how thick you've made your roll.  Remove, turn pan upside down onto baking rack and check for doneness.  Crust should be crispy.  Let it rest for 15 minutes before cutting into it.  Enjoy!  

Thursday, August 16, 2012

Summer Fruit Bread

Last summer I made jar after jar of Italian prune plum jam.  The flavor was pretty wonderful, but most of it was just too soft, more of a topping than a jam.  (The batch I spur of the moment added cocoa powder to and turned into chocolate plum jam, however, was perfect!)  I gave a little away, but rather apologetically, saying it was "like an ice cream topping, really", and I wonder if anyone even opened the jars I gave them, because I probably had the same look on my face as if I'd tried to foist several dozen overgrown zucchini on them. 

Now it's the middle of  August and I still have a dozen jars of it left (and also half a dozen jars of salsa) and the tomatoes, pears and plums (and yes, zucchini), not to mention beans and other produce items are about ready to need those jars.

This is one of my solutions.  This recipe will work for whatever fruit jam you don't particularly don't want to spread on toast at your house; just add a tablespoon or two of water if it's very thick.

This is a fine textured, slightly sweet, very flavorful bread, with a great aroma you notice as soon as you open the front door.    

Summer Fruit Bread Ingredients
1 1/2 c. all fruit jam; I used plum
2/3 c. water
2 tbsp. yeast
2 c. whole wheat flour; I use stone ground, malted
2 c. white bread flour


1 stick melted, cooled butter
2 egg yolks (for a fine crumb)
1 1/8 c. (approx.) bread flour
3/4 c. dried cranberries

Blend the jam and water in a blender until smooth.  Mix the other ingredients together thoroughly and cover with greased wax paper.  Let rise at least three hours and preferably four to develop flavor and help digestibility.

At the end of the rising period, mix in the melted, cooled butter, two egg yolks and one cup of bread flour.  Add the dried cranberries.  Turn out onto a breadboard and begin to knead, sprinkling on just a bit of flour at a time, maybe a couple tablespoons.  Knead approximately 5-10 minutes.  Do not knead all the stickiness out of it.  You should only have to add about 1/8 c. total additional flour after the one you added with the butter and egg.  Shape into a log and place on a greased pan.  Make ten or so diagonal slits in it, as above.  Cover with greased wax paper.  Let rise one hour or until doubled in bulk.

Place in 425 degree oven and cook approximately 40 minutes, then place on a wire rack to cool.  Do not cut open for 15 minutes because the moisture from within needs to move outwards and the dryness form without needs to move in.  The texture will be very much improved if you can leave the bread alone during this time.

Enjoy it; it does not even need butter or jam, since both are in it!